
I bought this Seagate Barracuda 2TB at 7200 RPM with 64MB Cache to replace the Samsung 1TB one inside the DriveStation. Sorry but I did not take some unboxing photos. However, the conclusion for replacement test is more important so I will put it here.
IT WORKS.
It would be hilarious if it doesn't work but if you think about it, it can happen. What if the power supply is limited? What if the firmwares hate each other?

Looking at the blinking blue light just relieves me.
And for anyone whose Windows can't recognize the drive after replacing the hard-drive, happened to me as well, try rebooting with the whole external drive disconnected, and then reconnect it. USB 2.0 has higher... tolerance(?) so try connect to USB 2.0 first.
Actually all the above was done about 2 days ago. The delay was because the simple work above is only a part of a grater plan: to replace the OS hard-drive.
My OS hard-drive was a WD10EARS. Caviar Green, not a good Boot drive, they said. Though my HDTune Read Performance Test showed no strange peaks, the information part was so hilarious that I won't post any of the snapshots of the result here. A total of 16 C5 errors, with 2 more added when scanning for bad sectors. No wonder the computer's boot time was increasing to 5 minutes. I decided to give the SAMSUNG Spinpoint F3 HD103SJ 1TB a shot, using drive-to-drive cloning.
Details:
Partitions on the source drive WD10EARS:
System Reserve, NTFS, 86MB
Main OS partition, NTFS, ~881GB (as I remembered)
Another OS partition, NTFS, 49.99GB
Partitions on the source drive HD103SJ:
Empty partition, NTFS, 931.51GB
Software needed:
Clonzilla
EaseUs TODO Backup Free 4.5
Steps:
Install and initialize the new hard-drive
- Shut down the computer. Not hibernation, full shutdown.
- Unplug anything from the back of the computer.
- Find a place for the new drive (HD103SJ). If you cannot find any screws to fix your hard-drive to the computer case as I did, you can use the wrapper for the new-bought hard-drive to insulate the bottom of the drive from the rest of other things and put it in the place for your CD drive or anywhere sensible enough.
- Connect SATA cable and the power cable to the new drive.
- Boot to Windows. If the BIOS shows any errors about hard-drives, then you may have to check the new drive for faults.
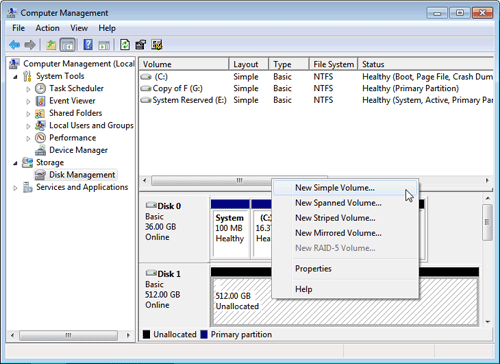
- Check your newly installed drive in Disk Management. If nothing else goes wrong you should see a black-labelled 'Unallocated' part in the new drive. Right-click this part and choose Initialize Disk.
- You should now see a window like this:

If you want to have a single partition with more than 2TB, or having more than 4 partitions (look here) but NOT being able to boot from (unless your motherboard comes with UEFI) then choose GPT.
If you do not want any one of the above features than choose MBR.
If you don't know what to want or even don't exactly know what partition is (why can you read to here?) then choose MBR.
Then click OK. - The drive is still shown as unallocated. Now you need to create a partition on this in order to start using it. If you are going to clone a system or data drive like me, this step can be omitted (go to step 11), but I recommend you to do it anyway. You just need to right click it, and choose New Simple Volume.
- Click Next 3 times if you don't want to create more than 1 partition. To be safe, you can uncheck quick format for a full format. Of course, this will take a MUCH longer time to finish. Leave it if you trust the hard-disk producer or you are running out of time. Remember to choose NTFS for the file system. Leave Allocation unit size as it is and type a volume label that you like.
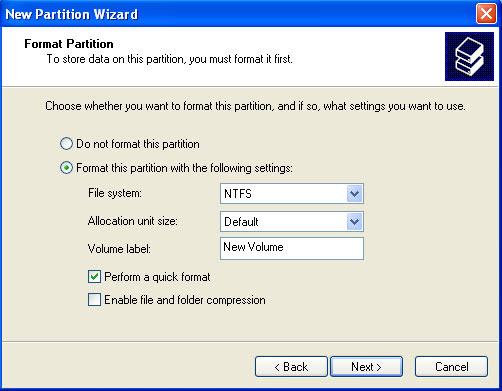
- Click Next and then Finish. You should now see under the Status of the new hard-drive as Formatting (x%). Wait until it finishes.
Cloning system drive
- At first I chose Clonezilla. Later I will explain why I included EaseUs TODO Backup.
- Follow this guide to make a bootable Clonezilla Live USB flash drive. Of cource you can use a live CD instead.
- Boot from the live USB. You might need to configure BIOS or go to boot menu in order to do this. Search the web for more information, as different motherboards have different settings.
- Press Enter.
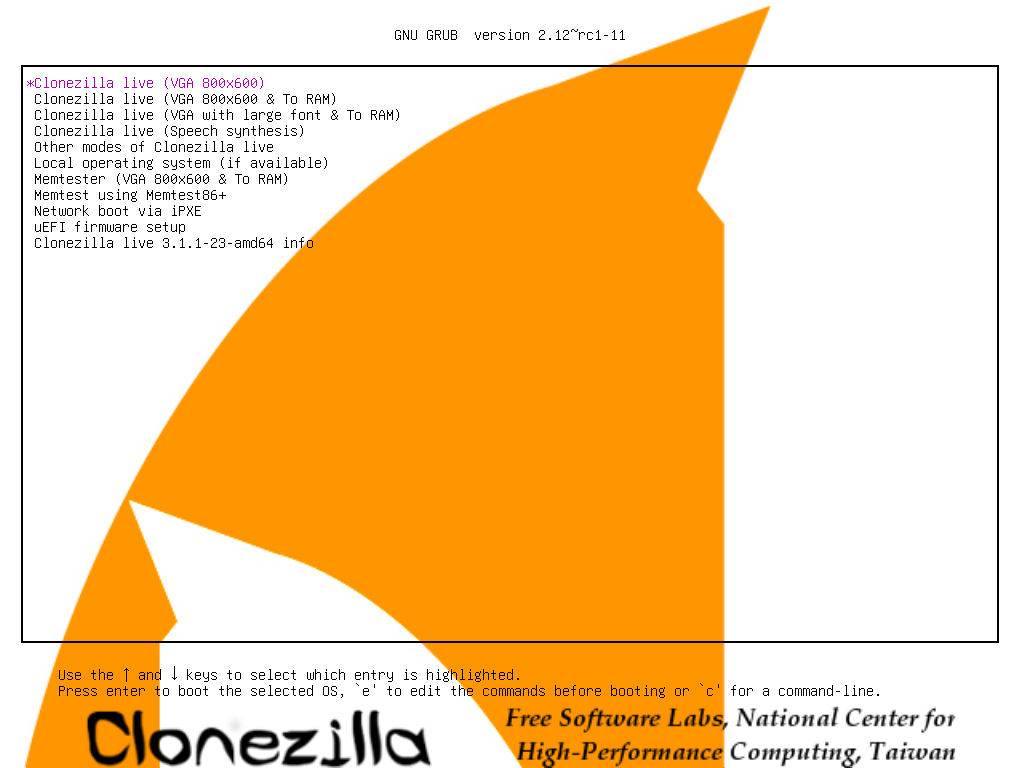
- Follow this guide from that point.
- Wish you the best of luck. Cause I don't have.
If clone fails...
When I was cloning the drive using Clonezilla, the number of read warnings (not errors, that would mean bad sectors) were flying sky high. The messages nearly crashes the progress bar of Clonezilla. Strangely, this only happened to the main OS partition. I can even boot to another OS partition after cloning!. The most frustrating part was I could not search any info about those messages.
If you are as frustrated as I was, before you try again, do the following:
- Boot from the original drive. You should now choose it from the boot menu instead letting BIOS decides, as it often chooses the wrong one.
- Go to Disk Management again. You may see something like this on the new hard-drive:

This is because the cloning successfully clone all identification information to the new hard-drive, even everything else fails. - Whether or not you see this, if you want to use this drive you can try this THEN GOTO STEP 6 to REFORMAT (you need this for safer cloning) or the somewhat dangerous approach that I used.
- Right click the drive and choose Online.
- Right click on each of the partition and choose Delete Partition, click Yes.
- Now format the unallocated partition as in Step 8 to 10.
- Reboot.
Use EaseUs TODO Backup
- Download and install this
- Follow this official guide.
- You need to wait for a great amount of time. My 1TB takes half of eternity. Recommend to check the shutdown option at the bottom and go to sleep.
If succeeded, you should now have two data identical drives. Unplug SATA cable , power cable and anything else from the original drive and boot. The BIOS should now boot from the new hard-drive, just like using the old one. Congratulations!
沒有留言:
張貼留言